 CB101066-T
$12.95
CB101066-T
$12.95Atari 400 / 800, Common items
We offer a complete inventory of 8 Bit Atari computer repair parts (down to component level, Switches, I.C. Chips, plastics....) as well as complete
computers and replacement Motherboards. Not
all of the thousands and thousands of Atari 8 bit parts we carry are
listed here. If you do not see the Atari 8 bit part you are looking for see the Best Rev. 10 Catalog or
E-Mail us at:
Jay G. of PA "Just wanted to say the Atari 800 I purchased off you guys is awesome!!!" Bests Recondtioned Atari 800 Computer. "My 16 year old daughter and I had so much fun over Christmas break playing all the retro games I have."
| 400 16K Atari NTSC U.S. Computer Reconditioned, New Atari 400 Power Supply, New Upgraded Cable Ready TV Switchbox, New Atari Basic Cartridge and Basic Manual. | CB101445 | Sold Out |
| 800 48K Atari NTSC U.S. Computer, Reconditioned, Used 800 Owners Manual, New Atari 800 Power Supply, New Upgraded Cable Ready TV Switch box, New Atari Basic Cartridge and Basic Manual. Optional Atari Composite Video cable to newer TFT, LCD or Plasma displays with Video and Audio inputs. Best Atari Tech tip on installing your Atari Composite Video Cable for first time installer. | CB101446 | Sold Out |
Karl L. of the UK Karl contacted Best because he had pulled his Atari 8 bit computers out of storage. He was a little concerned on the voltages he was seeing on his Atari 800 internal Power supply side board. A few E-Mails back and forth and Best told Karl all of the voltages he was seeing on his 800 internal Power supply board we normal. "Everything on my Atari 800 works except for the SELECT and START keys." A few E-Mails back and forth again, Karl was considering getting a new replacement 800 internal power supply board, which Best had in stock. Best suggested to Karl, because of the very very high cost of International shipping costs to the UK, it would be more cost effective for him, if he got 4 New 800 function button replacement Atari switches and replace all of the 30+ year old 800 Internal Power Supply side board with new ones. In the end Karl ordered the 4 new 800 switches, a New boxed copy of Atari Necromancer game and one of Bests New Atari 800 translucent dust covers. "The parcel arrived on Saturday morning, so less than 5 days to get here which was a lot better than expected. I swapped out all the buttons on the Atari 800 power board just to have them all new. I'm over the moon that the old girl now looks and performs like it just rolled off the production line. The Necromancer game worked perfectly. The cover looks great too. All in all - very satisfied with my purchases. I'll get another order in next week."
Mark Y. of PA Mark contacted Best because he was trying to get his not working Atari 800 computer (he purchased new in 1980's) going again. Atari 800 Diagnostic questions asked and answered, 5 to 6 E-Mails back and forth, Best suggested Mark get a new Atari 800 US CPU and a new Atari 800 OS plug in replacement cards. "Just wanted to let you know that your board replacement suggestions were spot on. The new boards work perfectly and the Atari 800 is up and running again after 40 years. Thanks again!"
Cliff F. of PA Cliffs 30+ year old Atari 800 required a New replacement Atari Keyboard. "I just wanted to thank you for everything. I got the keyboard yesterday and installed it today. It is working great and the Atari 800 is up and running. You guys gave me back a piece of my childhood and I wanted to say thank you! I will definitely make sure to recommend you guys for everything Atari!"
Atari Trivia Information / Question: Do you know what the Atari acronym A.P.C.D. and A.H.C.D. stands for? It was used on a lot of Atari paper work and Atari box labels (identifying the Atari products inside the Master cartons of Atari products stacked on pallets) on boxes of Atari 8 bit products in the early to mid 1980 Atari era. They stand for Atari Home Computer Division (Green strip across the label) and Atari Personal Computer Division (Red strip across the label). Back then the Atari Consumer division had the APCD then it changed to AHCD, and VCS (2600) departments.
| 800 / 400 Atari Field Service Manual For all International PAL and UK Versions. Sections covered: Introduction, Theory of Operation, Silkscreen and Schematics, Trouble Shooting and Testing, Disassembly / Assembly, Maintenance, 400 Diagnostic Flow Charts, 400 / 800 Symptom Check list, 800 Diagnostic Flow Charts, Game Controllers, 800 / 400 complete Parts List, Atari Service Bulletins and list of all illustrations 241 Pages. | FD100002 | $35.00 |
| 400 / 800 SALT (Stand Alone Test) 2.05 US Diagnostic Cartridge with 14 tests. Anyvideo, Color Bars, Grey Bars, Keyboard, Port Test (requires Port jumper board and 13 pin short plug), Ram Test, Switches, Tone Test, Verify ROM, Production Test, Boot B, Display Options, Examine, Adjust Sound, GTIA, Light Pen Tests. With the SALT 2.05 Diagnostic cartridge you can run single diagnostic tests or continuous burn in diagnostic tests on repaired 400 / 800 computers. | TE15644 | $35.00 |
| 400 / 800 SALT External 4 Port Diagnostic Jumper / Shorting board required for the above 400 / 800 Joystick Port test. | TE15638 | $45.00 |
| 400 / 800 External SIO Shorting plug required for above SIO Port Test | TE15639 | $7.95 |
| 400 / 800 U.S. C.P.U. Board Populated | CA017173 | $19.95 |
| 800 U.S. OS Card, less plastic case (Ref: CX801) | CO12989 | $29.95 |
| Atari 800 US Recondtioned keyboard. Sold 2 ways. Exchange 800 Keyboard core required on one method. Exchange 800 Keyboard must be complete with all key caps, no damage on connectioning cable. Only Atari 800 brand Hi Tek and Stackpole versions / brands accepted. No Mitsumi made 800 keyboards accepted ! The old 800 keyboard core must be sent in and Inspected / accepted before the reconditioned 800 keyboard is shipped to you. Second method is out right buy, No exchange 800 keyboard core required. |
CA012952-REE CA012952-RE |
$235.00
$275.00 |
| Atari 800 US Fully Populated Motherboard, Limit one! | CA014829 | $89.95 |
| Atari 800 US Power Supply sideboard | CA014171 | $29.95 |
| Atari 800 UK Power Supply sideboard | CA014171-UK | $29.95 |
| 400 / 800 PAL CPU card with CO14887 + CO14889-03 PAL I.C.'s, CO14806 MPU I.Cs and support chips. | CA015967 / CA06113 | $29.95 |
| 400 / 800 PAL CPU card with CO14887 + CO14889-01 PAL I.C's, CO14806 MPU I.C. and support chips. | CA015967-1/ CA06113-1 | $39.95 |
| 800 PAL OS Card, no plastic case (Ref: CX801-P) | CA014961 | $39.95 |
| Atari 800 door spring, 2 used | CO14093 | $4.95 |
| 400 / 800 16K RAM Board Populated Less plastic Case (Ref. 800 models CX853 Module). | CA014802 | $34.95 |
| Atari 400 / 800 snap in rubber feet (4) | 88-1006 | $2.50 |
| Atari 400 US Power Side board | CA014155 | $19.95 |
| Atari 400 UK Power Side board | CA014155-UK | $29.95 |
| Atari 400 US Mono Panel Keyboard | CA017999 | $45.95 |
| Atari 400 door spring, 1 used | CO14104 | $3.95 |
Alan W. of OH On his second Atari to Best, Alan picked up a New replacement Atari 800 computer motherboard for his 800 computer that was having SIO port problems. "Just wanted to say thanks for the quick shipping and being a great resource to find old Atari parts! Received the motherboard yesterday and now have a fully functioning Atari 800 working perfectly. Thanks!"
Ray P. of Canada Ray contacted Best about a week ago. He was trying to revive his 25 year old (the last time he turned it on) Atari 800 computer. A couple E-Mails back and forth. Ray purchased a Best Enhanced Atari Composite Video cable and a few new Atari 800 Games. "Just wanted to say THANKS for your responsiveness and excellent service!! We received our shipment from you guys in 4 business days and we are in Canada - that is amazing! The Atari 800 fired up great with the new games and cable we purchased!"
Rommel M. of MD Rommel contacted Best with a list of Atari items he wanted to buy. We looked over his list of Atari items and suggested he drop the new Atari 825 printer he was thinking about getting and go with the Supra MPP Micro Printer interface (to allow him to direct connect an old Epson printer he still had to his Atari 800 computer). Reconditioned Wico Ball Joystick, Best Custom made Translucent 800 Dust Cover, Atari 400 / 800 SALT 2.05 Diagnostic test cartridge and the MPP Printer Interface latter. "Just writing to let you know that the package arrived, and that the Micro Print printer interface works wonderfully. So does that Wico joystick. Also like the cover very snug fit. Will fire up the Salt II tonight. Thanks, and I will entrust you with my Atari business from now on."
Robert M. of MI
"It is amazing, that after
30 years these little 8 bit machines are still going strong and
still have a pretty strong following. I have ordered parts and
software from Best Electronics dating all the way back in to
the 80's. I really hope you do not decide to suspend Atari sales,
that would be a huge loss to the Atari Community. Every time I
visit your site, I find something new, something I did not see
before. I have often wondered what kind of treasures could be found
in your warehouse."
Follow up Comment: Thank you for your continued support of the Atari after all these years.
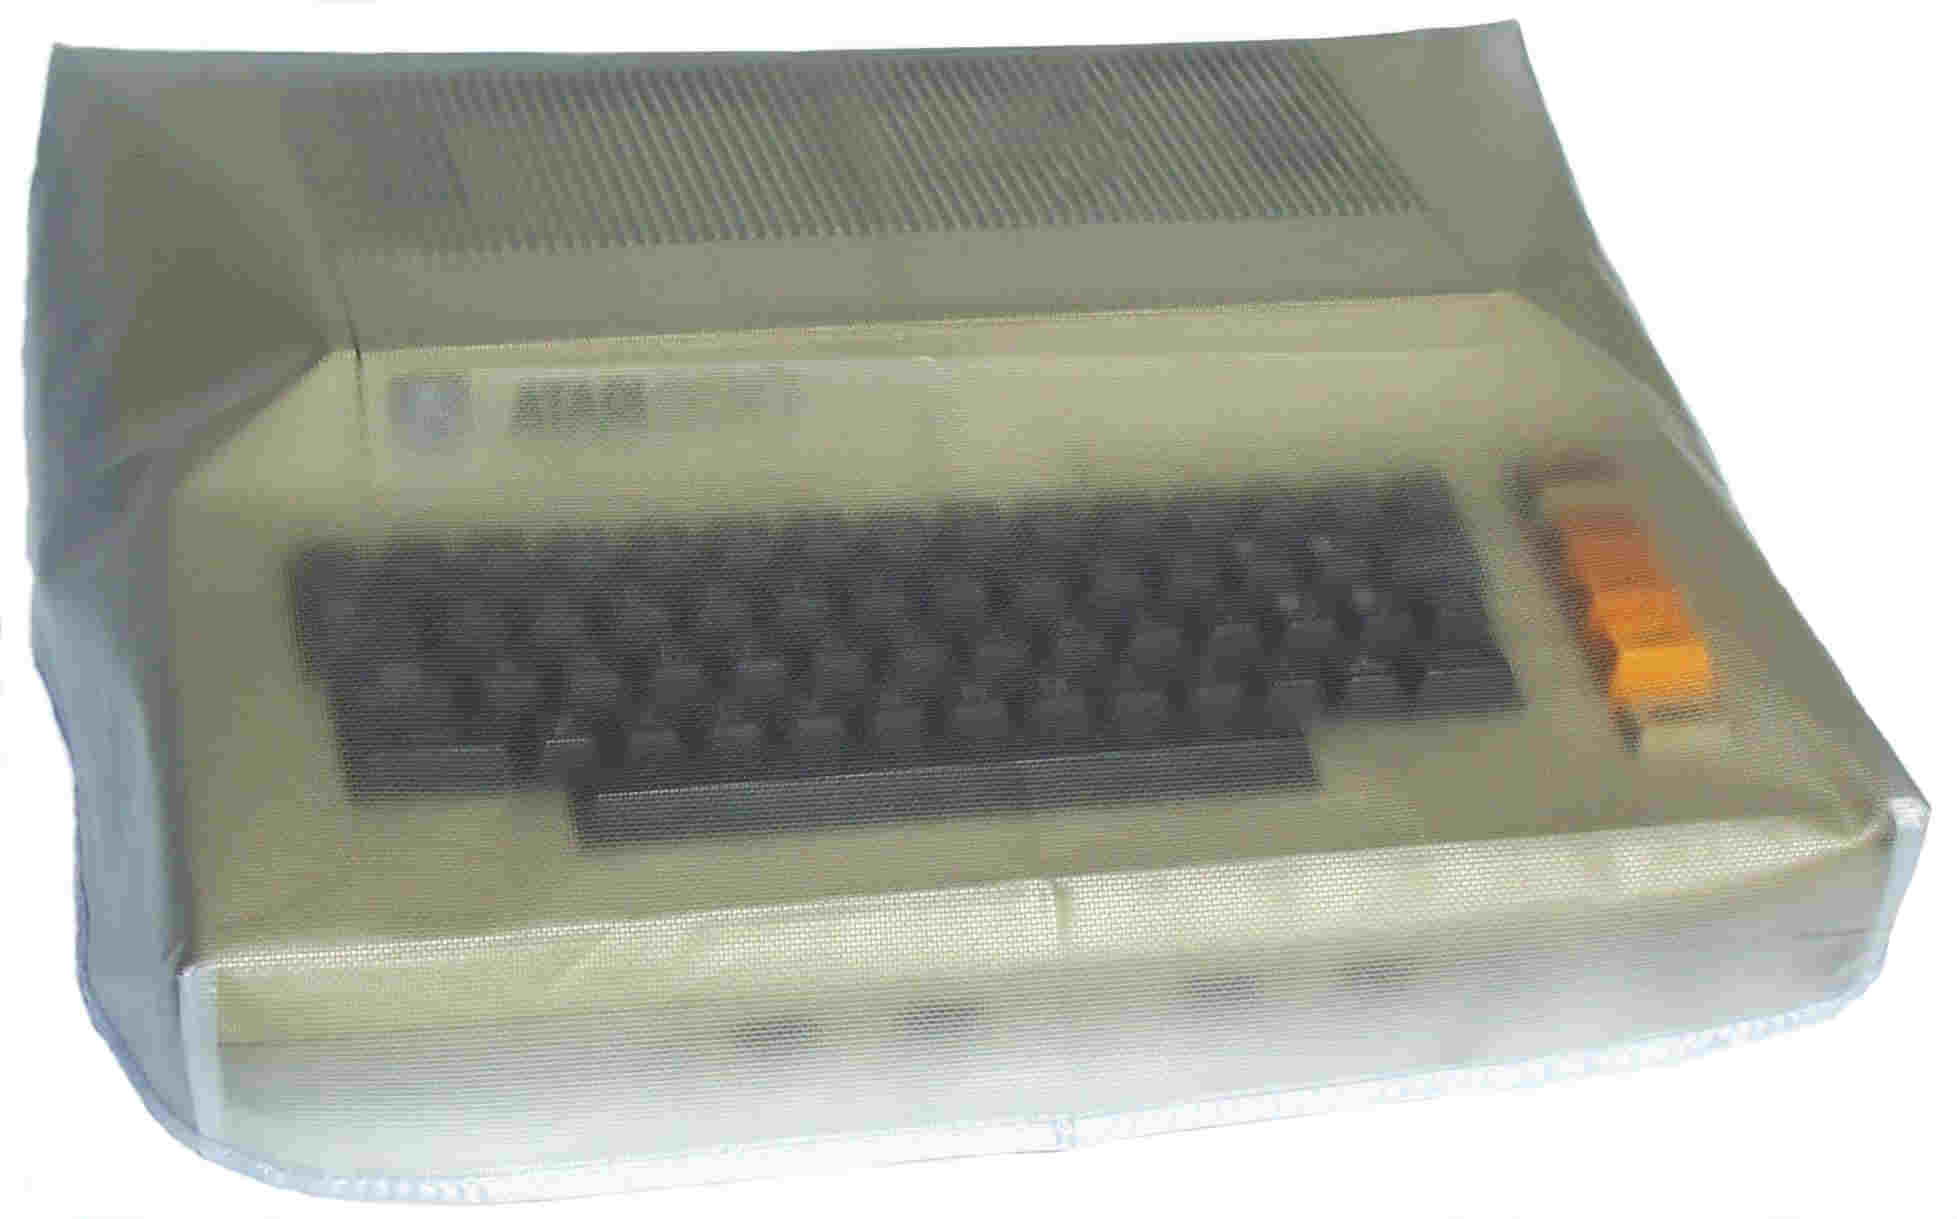
New
translucent see thru Atari 800 Dust cover that has a custom tailored fit with
reinforced edging around the base and a light surface texture.
CB101066-T
$12.95
The Atari CX77 Touch Tablet is an Art and Graphics Controller that is plugged into a Joystick port and designed for use with the Atari 8 bit Computers (400, 800, 600XL, 800XL,1200XL, 65XE, 130XE and XE Game machine). You can Draw or Trace pictures with the CX77 Stylus, a pen or even your finger. You have your choice of 8 brush widths with 128 Computer Generated Colors with 8 brightness levels. Create Automatic Circles, Squares, Discs, Boxes, draw perfect Circles, Squares, Rays and Straight lines, draw a series of Connected Straight lines, Mirror Images, Fill objects, Erase objects, Magnify to eight times normal size any portion of your Atari Touch Tablet Drawings. Pictures drawn on your Atari CX77 Touch Tablet can be saved to an Atari Cassette or Atari 810, 1050 or XF551 Disk Drive. You can also load The Popular Micro Illustrator Program drawn Pictures on the CX77 Touch.

Old Atari 8 Bit Owners will remember the early Kola Drawing Pad with the smaller drawing surface. The Atari CX77 Touch Tablet was Atari's Answer to the Kola Pad a couple of years latter with many New Improvements over the original Kola Drawing Pad. The only draw back with the Atari CX77 was when they were released 10 to 15 years ago, they were always in short supply in the US. Many Atari 8 bit uses never saw one or only saw pictures of them only. We found these Rare New Atari CX77 Touch Tablets in an Atari Warehouse in Holland. The labels on the Pallets of them, said they came from the Atari Warehouse in Italy!! Best Electronics spent the time and money and re-imported then back into our US Warehouse from Holland. The Atari CX77 Touch Tablet comes with Drawing pad surface Protective Mylar cover sheet (Spare Protective covers are available from Best), Stylus Pen, AtariArtisit Cartridge and 21 Page Owners Manuals.
$79.95
Michael P. of CA "Just wanted to let you know that I un-boxed the CX77 Touch tablet today and tried it out, and I'm a very happy customer. It's probably the first time in 30+ years that I've had something brand new and sealed from Atari. Really brought me back in time in a good way. And the product works great!"
James R. of CA. Placing his 4th Atari order in a row in the last few months, this time James ordered a New in the box Atari CX77 Touch Tablet and the very hard to find New in the box last Generation made, Atari XC12 Program recorder. "Just wanted to drop you a note to let you know I received my latest order today - the touch tablet and program recorder. As always, I’m thrilled and so appreciative to you guys for keeping the brand alive. Love to share the happiness you guys provide."
Best Atari Tech tip: on switching your Atari console from a RF (TV switch box) connection on your TV / Display to a Composite Video display (Red, Yellow and White RCA connector inputs). If you have one of Best upgraded Atari 2600 or 7800 consoles with New Composite Video outputs or one of the Atari 8 bit Computers with a Composite output jack (Atari was about 30+ years ahead of their time, by putting a Composite Video out port on most of their 8 bit computer products, which nobody used the Composite Video standard back 30 years ago. Now a days just about any Game machine and Video display all have the industry standard Composite video Input jacks) this Atari Tech is for first time installer.
Just about 99% of the New Video Displays (LCD, HD, Projection, Plasma , or older Tube Monitors / TV's) you will connect up your Atari console to, all default to the RF / Connection input on the back side of the display. So when you connect up your Atari console to your newer display Composite RCA input jacks, your newer display will not auto detect or auto switch to the Composite Video inputs once you turn on your Atari console. You typically (using your remote control) will have to go into the Display set up Menu and tell your display to access the Composite Video input jacks. On some Video displays (using your remote control) just running down the TV channel select button below channel 2 will allow you to access the Composite Video, AV1, AV2, AV3 and S-Video display options.
Current Pacific Standard Time is:
E-Mail:
